For many 3D printing enthusiasts, the ability to create multicolor 3D prints at the consumer level is a dream come true.
If you have a traditional, single-extruder setup, you can do so by pausing at specific layers or by splitting a model and printing the parts individually, then gluing them together. Thanks to innovations like Bambu Lab's Automatic Material System (AMS), multicolor 3D printing is now more accessible than ever and without any hassle.
In this tutorial, we'll walk you through how to achieve multicolor 3D prints using the AMS. This convenient device allows you to use multiple filaments in one print, detect filament runout, and maintain optimal conditions by keeping the material dry while stored.
The combination of a Bambu Lab 3D printer, the AMS, and Bambu Studio forms a powerful setup for easy and efficient multicolor 3D printing. With just one AMS, you can work with up to 4 different colors, but for those seeking even more variety, you can sync up to 16 colors by using an AMS Hub.
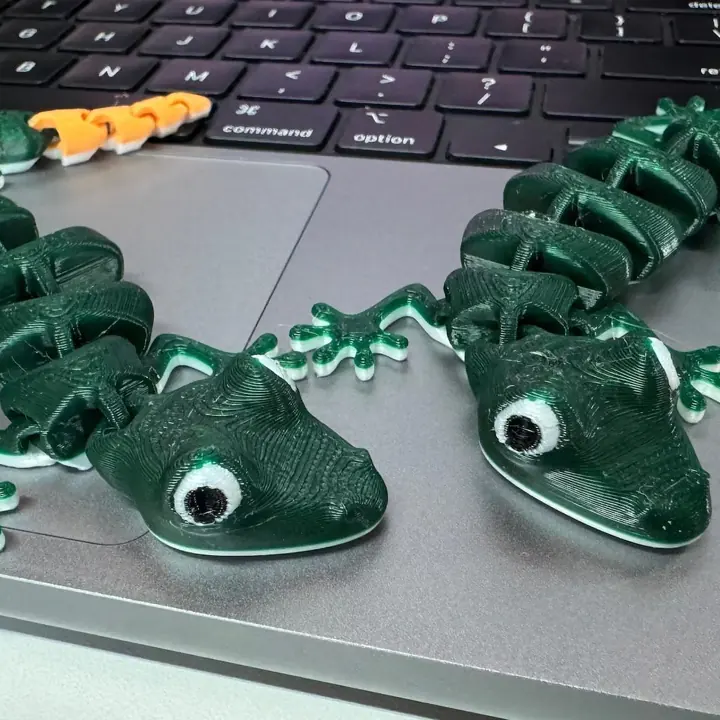
In this tutorial, we'll show you how to 3D print the Articulated Lizard v2 from maker McGybeer. We'll go over how to set up and synchronize Bambu Studio with the hardware, how to add specific colors to the different parts of the model, how to 3D print it, and last but not least, we'll go over a few tips and tricks to guide you on this colorful new path.
Needless to say, you'll need to have Bambu Studio installed and a Bambu Lab 3D printer connected to both the AMS and Bambu Studio, with the correct printer profile selected in the slicer. Our tutorial will start assuming this has already been done.
Ready to add some color to your 3D printing life?
Step 1: Basic Printing Settings
We'll begin by preparing the print just like we would any standard project in Bambu Studio.
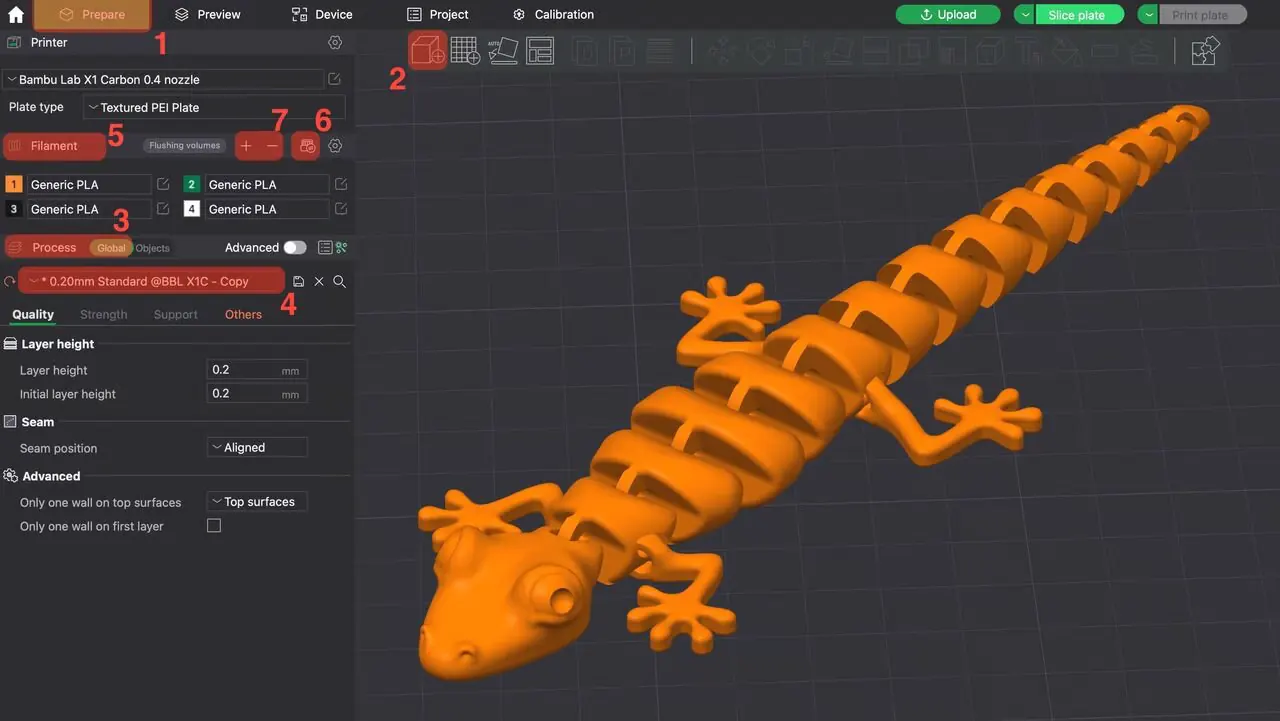
To start, in the "Prepare" tab (1), click on the cube icon (2) to import your 3D model (or click "Ctrl + I" or go to "File > Import > Import 3MF/STL/STEP/SVG/OBJ/AMF…"). When the model is first imported, it will automatically be assigned to the filament loaded in Slot 1 of the AMS.
Since our focus here is on multicolor printing, we won't be tweaking many of the standard printing parameters. Under the "Process" block, with "Global" toggled (3), select the "0.20mm Standard" preset (4). This is the slicing profile we'll use after we define the colors for the model.
Next, under the "Filament" block (5), you can either synchronize the filament slots (6) with the AMS setup or you can manually add different materials by using the ‘+' and ‘-‘ icons (7). This is where you can assign different filament types and colors based on what you intend to use for the project.
It's important to note that the filament list is saved within the 3MF project file, meaning it will be restored when you load the file later. If you need to pause the project and you export it as an STL, the color information will be lost and you'll need to add it again.

For this tutorial, we'll synchronize the AMS filaments to reflect our choice of using PLA in four different colors. As mentioned, we'll assume you've already got Bambu Studio set up for your specific Bambu Lab printer and AMS, with the filaments already added, both in material choice and color.
We'll assign green filament in Slot 2 as the base color for our object because it's the most used hue for our lizard; it'll be easiest to change the color of other parts. This is a useful way of choosing the base color for your model. At this stage, the entire model is set to be printed using the green PLA filament instead of (in our example) the default orange PLA.
There are a couple of ways to assign a different filament to a model than the one set by default.
From the Object List
- Toggle "Objects" (1), which will display a list of the objects in your project.
- Click on the object in the list (under "Plate 1", in our example). Click on the colored square associated with the filament slot number (2) to select it, then click on it again. This will open a drop-down menu listing all the filaments in your project.
- Choose the appropriate filament for that object or part.
Right-Click the Object
- Right-click on the object in the workspace.
- Navigate to "Change Filament" (3).
- Select the desired filament from the list.
In the next steps, we'll add more colors to the print with the "Color Painting" tool.
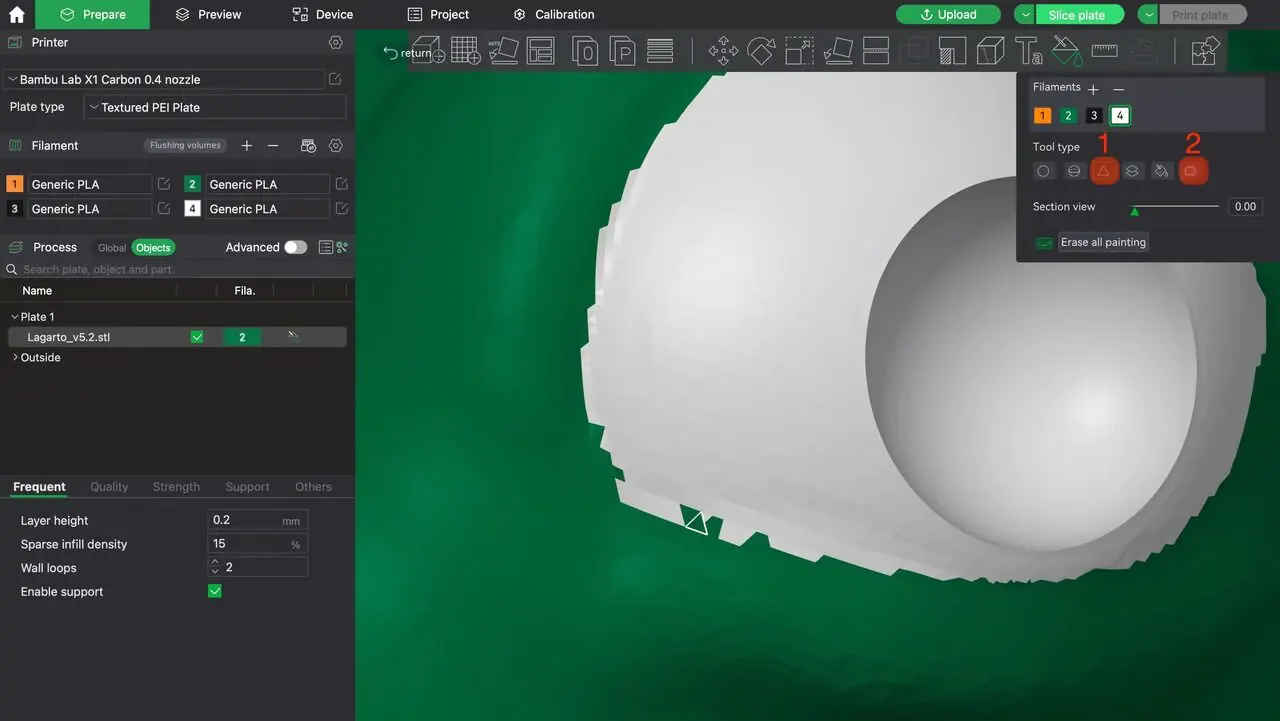
Step 2: Changing Color by Height Range

Now it's time to add more colors to the model.
To begin, we'll use the "Color Painting" tool (1), which you can activate by selecting the model and pressing the shortcut key ‘N'. You'll notice that the build plate disappears from the working area, which makes it easier to view the bottom and other areas of the model.
The Color Painting tool offers six different modes of operation, providing a variety of ways to apply color to your print. For this step, we'll use the "Height Range" mode (2) to apply color to all facets between a given height range, which is perfect for creating distinct color sections along the vertical axis.
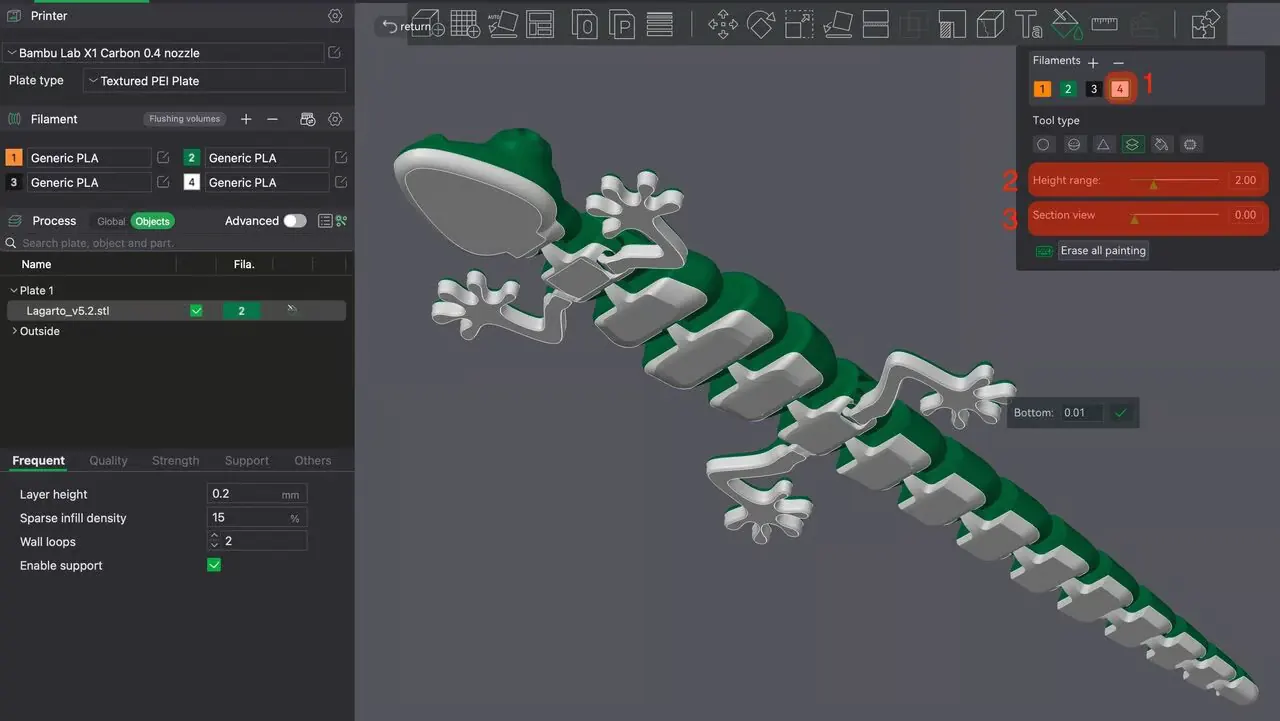
Let's start by coloring the belly of the lizard. The "Height Range" mode allows us to easily assign a different color to a horizontal stripe throughout the whole model. To do this:
- Select the "Height Range" mode from the "Color Painting" tool.
- Choose the filament color you'd like to apply; in our case, we'll select the white PLA from Slot 4 (1).
- Set the height range for the color application (i.e. how tall the different color will be). We'll choose a range of 2.00 mm (2), although this number will be dependent on how tall your model is and what color changes you want in it.
- Move the cursor over the model and you'll see the selected height range highlighted, giving you a preview of where the color will be applied. You can manipulate the view of your model by zooming in (with your mouse scroll) or panning (right-clicking on the background and moving your mouse).
- Adjust the range as needed to see how it affects the colored area (e.g. increasing or decreasing it for more or fewer layers having a different color).
- Once you're satisfied, right-click on the model; the height range should appear in the specified new color. For our example, we'll apply a stripe of color starting from the bottom of the model.
The "Height Range" mode is great for defining clear, even color transitions based on an adjustable range, making it ideal for applying solid color bands along the model's height.
Although we won't use the "Section view" option (3) in our tutorial, it's worth noting that this feature allows you to hide or reveal sections of the model, which can be helpful when working on inner or obscured parts.
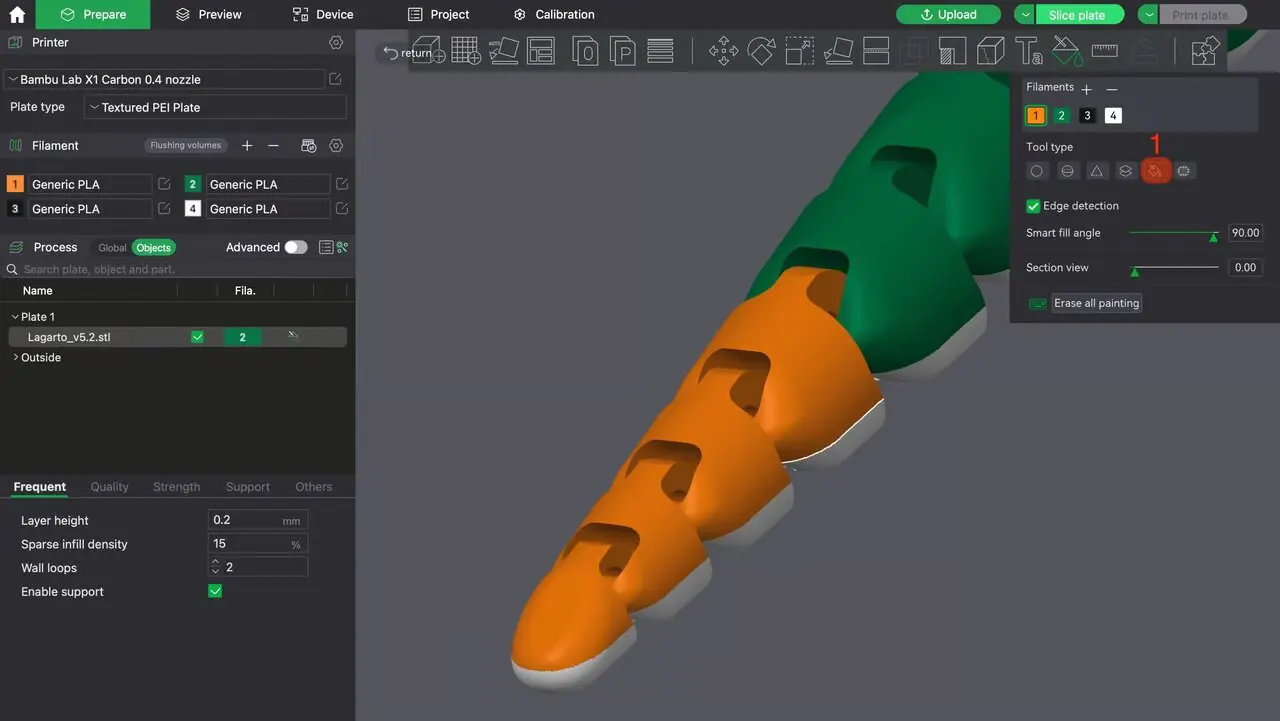
Step 3: Using the Circle & Sphere Tools
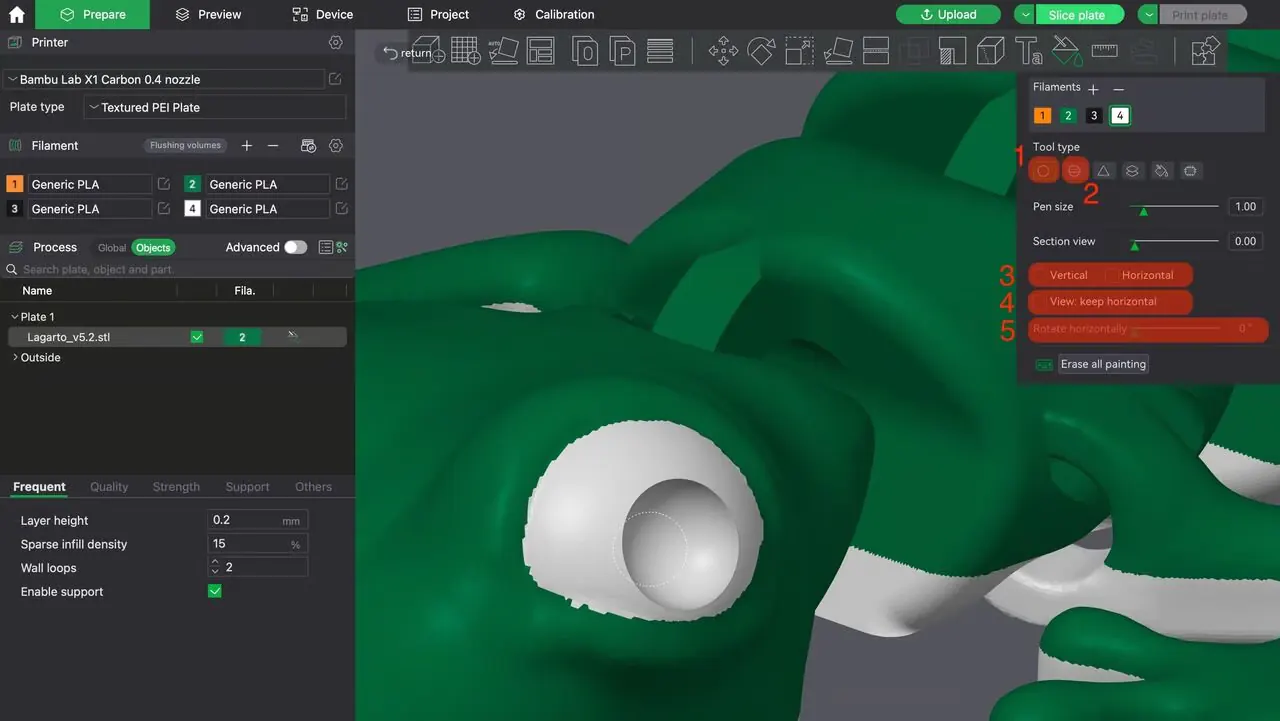
Next, we'll focus on painting the finer details of the model, specifically the white part of the eye. For this, you can choose between the "Circle" (1) and "Sphere" (2) tools (under "Color Painting"), depending on the effect you want to achieve.
- Circle Mode: This works like a 2D circular brush, painting a flat circular area on the model's surface.
- Sphere Mode: It acts as a 3D sphere brush, allowing you to paint more rounded areas, which is great for objects with irregular volumetry.
Both tools are excellent for precision work, and you can adjust the pen size to control the level of detail. A bigger pen size will be good for larger areas, while a smaller one is ideal for delicate work like the eyes.
Using these tools is as simple as:
- Selecting the filament color you want to add.
- Selecting the tool and increasing or decreasing the pen size depending on the part to be painted.
- Clicking on the parts where the new color has to be added.
Vertical & Horizontal Pen Locking
The "Vertical" and "Horizontal" checkboxes (3) are neat features that lock the pen strokes in the specified direction. This ensures that your brush strokes stay perfectly aligned, either vertically or horizontally, making it easier to paint with precision.
Helpful View Tools
- View: keep horizontal (4): This feature allows you to snap the model back to a horizontal orientation at any time. This is useful if you've rotated the model and want to return to a standard view.
- Rotate horizontally (5): This option lets you smoothly rotate the model on its horizontal axis while you're painting it, which helps when you need to access different parts of the design from various angles.
For Tiny Details: Triangle Mode
For very small or intricate areas, like the finer details of the eye, the "Triangle" mode (1) is your best option. This tool lets you color individual triangles of the model's mesh, allowing you to apply color to particular areas precisely. It's perfect for situations where the Circle or Sphere brushes may be too broad.
Using it is simple:
- Select the color.
- Select the tool.
- Click away on the model.
Filling Gaps: The Gap Fill Mode
Once you've painted the areas with the Circle, Sphere, or Triangle modes, you may have small unpainted gaps. The "Gap Fill" tool (2) is designed to help you fill these gaps efficiently, and applying it is straightforward.
- Once you're done painting, select the "Gap Fill" tool.
- The mode will highlight the areas that need filling in a shade of the selected color.
- You can adjust the gap size ("Gap area") to fill smaller or larger gaps.
- Once satisfied, click "Apply", and the tool will fill the gaps with the selected color.
This ensures that even coarsely painted areas have consistent color coverage, saving time and effort.
Step 4: Using the "Fill" Mode
As its name implies, this feature paints specified or suggested areas or parts (similarly to the "Fill" tool in Microsoft Paint).
To demonstrate how this tool works, let's color the tip of the lizard's tail orange:
- Select the "Fill" Mode (1) from the toolbar.
- Choose the color you want to add (in our case, the orange PLA in Slot 1 of the AMS).
- Unless you want to paint a very small or sharp part, make sure that "Edge detection" is deselected (see more below).
- Hover the cursor over the section you want to paint (in our example, the tail's tip). You'll notice that the area's edge is highlighted, showing which part will be painted.
- When you're ready, left-click to apply the orange color.
It's worth noting that the "Fill" tool replaces one color with another, and it won't affect areas that have already been painted a different color unless you actively select it. For instance, the white section at the bottom of our model will remain unchanged, while the green area of the tail is swapped for orange.
Edge Detection for Precise Filling
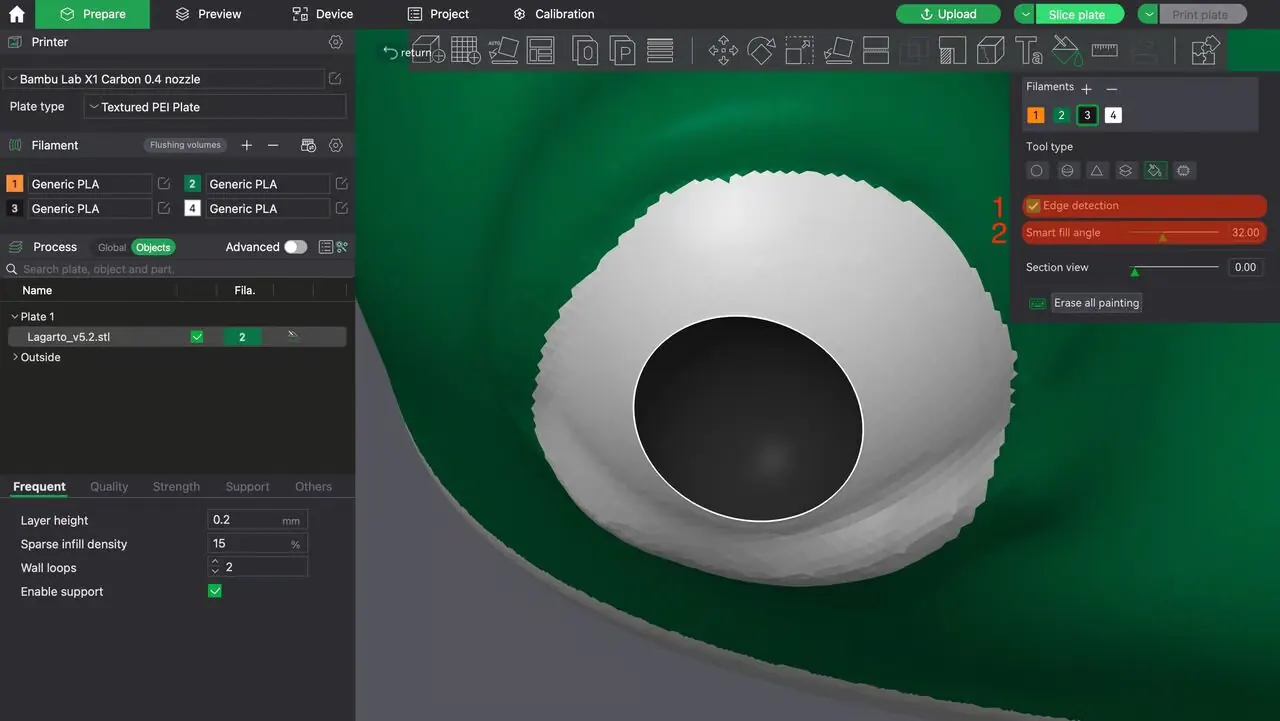
If you want to control how the color is applied around areas surrounded by a painted color or that have a sharp and continuous edge, the "Edge detection" (1) feature is extremely useful. When enabled, instead of filling entire connected areas of the mesh, the tool will detect edges based on the surface geometry.
You can adjust the "Smart fill angle" (2) to define how sensitive the edge detection should be: Higher values allow for smoother transitions, while lower values restrict the fill to sharper corners or distinct boundaries. With this tool, in our case it's very easy to color the black spot of the lizard's eye, because of its sharp circular edge.
This tool is particularly useful when you're working with models that have complex surfaces or when you need to apply color without bleeding into adjacent parts of the mesh.
Step 5: Slice & Send to Print
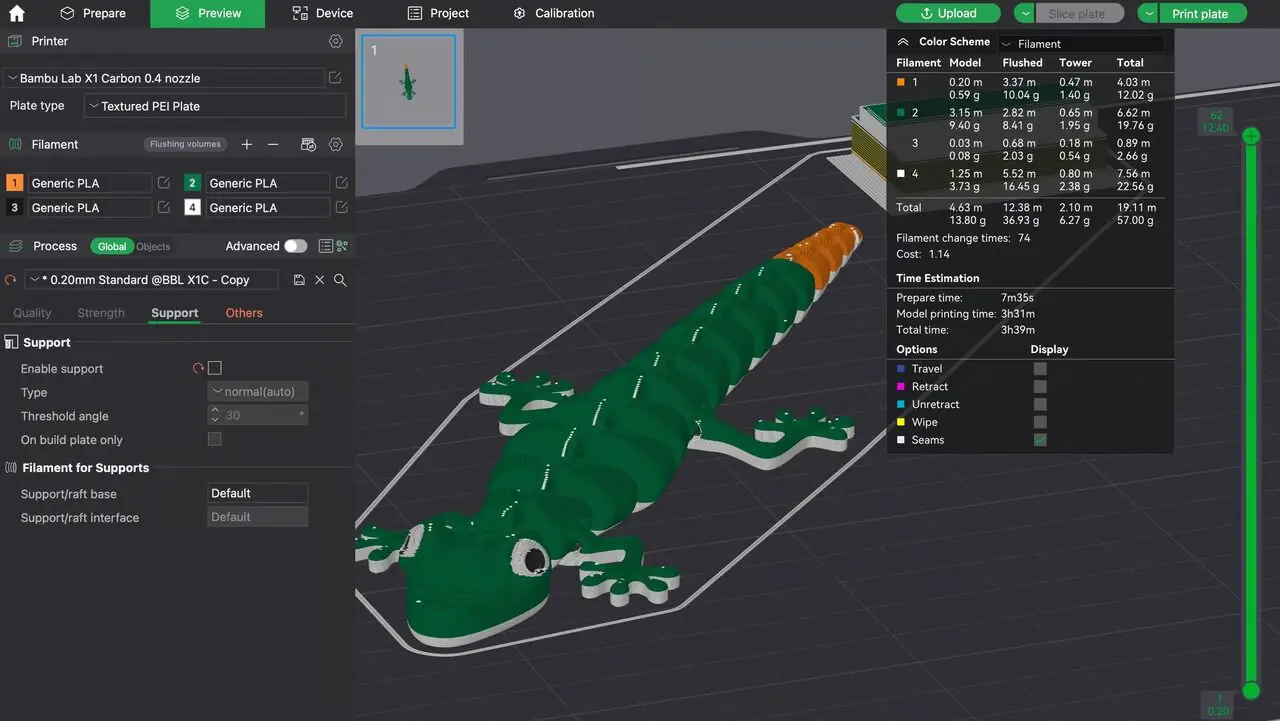
Now that we've added all the desired colors to our model, it's time to slice and send the print job to the printer.
As mentioned earlier, we're keeping the focus on the multicolor aspect, so we won't make many adjustments to the printing parameters. Under the "Process" block, with the "Global" toggle enabled, we'll stick with the "0.20mm Standard" preset for slicing. This will ensure a balanced print quality with smooth color transitions.
- To slice the model, click on "Slice plate" (top right).
- With Bambu Studio connected to your Bambu Lab printer, and to ensure that the filaments are in the right spot, click on "Print plate" (next to "Slice plate").
- A pop-up window will appear, specifying which machine you want to send the print to, the expected time and material use, and the filament colors as reflected in both the model and the different slots. This will be useful to confirm the information (and make any necessary changes), as we'll see next.
Altering Filament or Slot Mappings
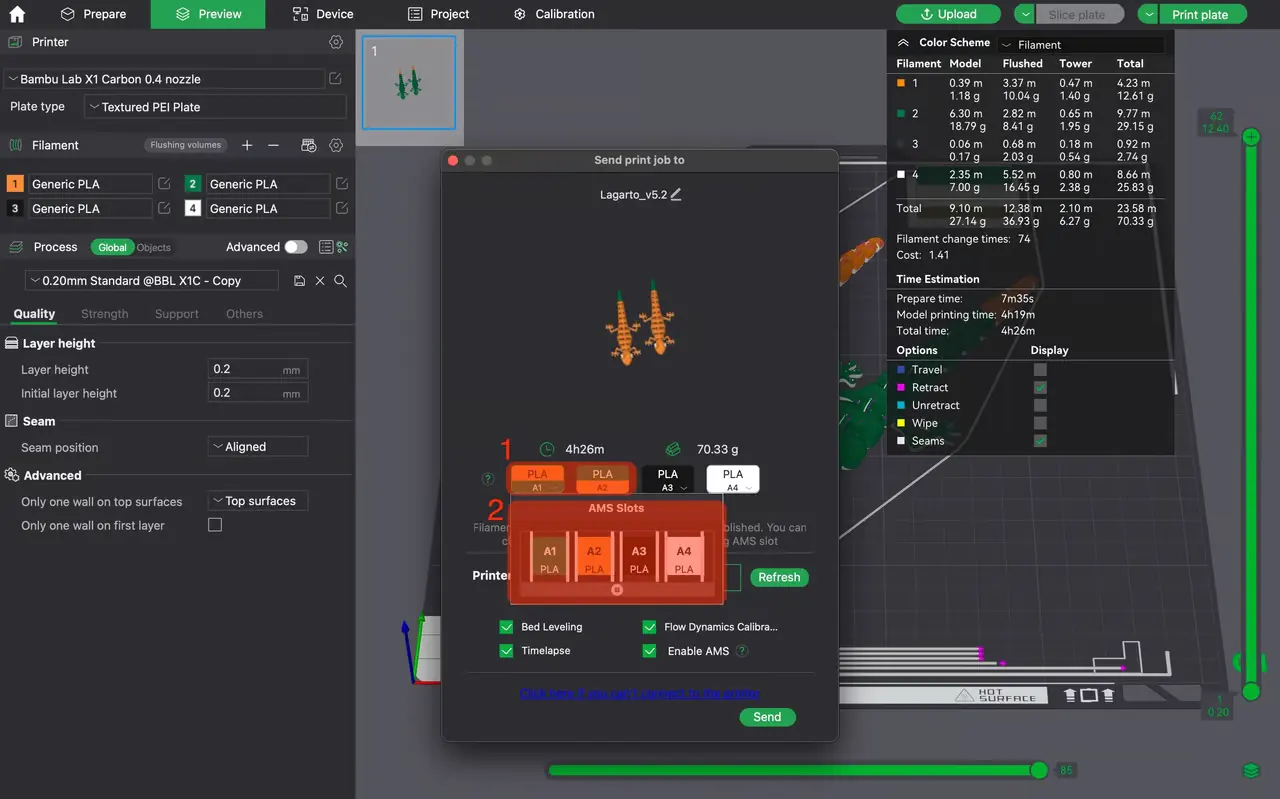
Before sending the print, it's a good idea to verify that the colors are correctly mapped to the AMS slots (1). If you notice that the filament slots don't match the assigned colors in your project, you can easily fix this by altering the AMS slot mappings (2).
For instance, if you assigned green as the color for Slot 2, but said filament is actually loaded in Slot 1, you can update the mapping before sending the print job to the printer. To do this, simply click on the arrow next to the specific slot you need to change and select the correct one from the options. This allows you to avoid the hassle of loading and unloading spools.
Once everything is set up and verified, send it to your printer. The AMS will take care of switching between the different filaments during the print process, allowing you to sit back and watch your multicolor print come to life.
Tips & Tricks
Multicolor 3D printing opens up a world of creative possibilities, but it comes with its own set of challenges. Knowing the right techniques can make all the difference. Here we present a few tips for a successful colored 3D printing.
- Task complexity: Multicolor prints range from simple to complex. While models with few color changes are quick to set up, intricate designs take longer. Plan your model and colors ahead to streamline the process.
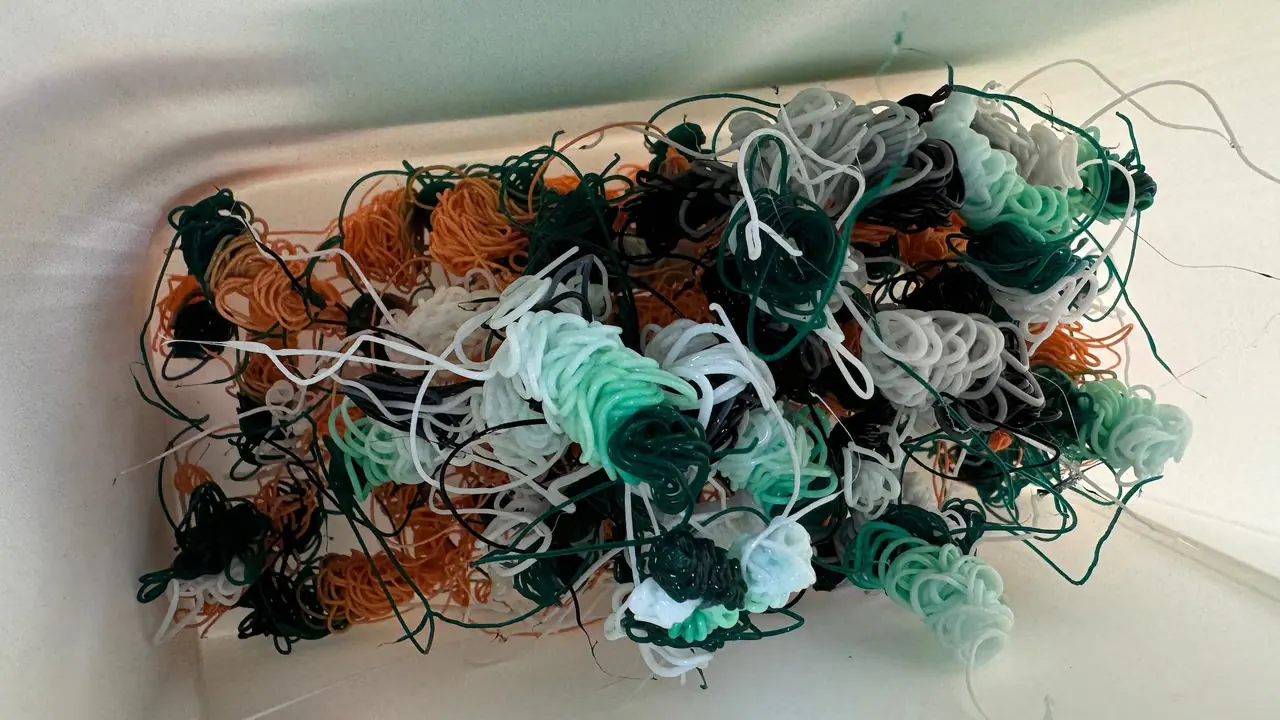
- Filament waste: Color transitions during multicolor printing cause more filament waste than single-color prints due to purges. Minimize waste by tweaking settings, such as purging less between similar colors or using infill for purges. Check out Bambu Lab's guide for tips on reducing filament waste.
- Batch printing: Printing multiple copies of the same model doesn't increase purge waste. Batch printing is an efficient option when making several identical designs, keeping filament usage in check.
- Purge build-up: Filament can build up inside the machine during long prints. Regularly check and clear the purge area to prevent issues. A small bin or tray can help collect and dispose of the material easily.
- Temperature compatibility: Stick to filaments with similar temperature requirements (e.g. avoid mixing PLA and ABS) to prevent print failures and inconsistencies.